Thursday, November 18, 2010

Flautas


This is another one of those "more of a tip or technique than recipe". I'd made that pork roast and wanted to figure out a way to use leftovers up. The pork roast (Pernil Asada) is very flavorful so transforming those flavors by adding more spices might not work. I essentially wanted to add something to the meat without having to add too many more seasonings to try to make the dish work. I'd recalled seeing a recipe that made taquitos baked instead of fried which I liked for two reasons: healthier and EASIER. Guess which of those reasons is the biggest plus to me. :)

I wanted to use what I had in the house and I recalled this recipe and confirmed I had a can of pinto beans. I also had flour tortillas on hand and in doing some research I learned something new. Flautas are essentially taquitos that are made with flour tortillas instead of corn tortillas! So I preheated the oven to 425 and grabbed the leftover pork roast, some cumin, the can of pinto beans and the flour tortillas.  


I rinsed the can of pinto beans and added them to the pork roast I'd already added to the pot to heat up. I also added 1/2 tsp of cumin to the mix.


I knew the pork would be easier to shred once it was heated through so I left it as is and heated on medium, covered for about 5 minutes.

Once the juices from the roast were liquid again and the meat seemed heated through, I grabbed two forks and shredded the meat up.


Once the juices from the roast were liquid again and the meat seemed heated through, I grabbed two forks and shredded the meat up.


One "ingredient" I left out of the picture! Cooking spray... I have a couple different version but I went with the Canola Oil cooking spray. For the flautas, I used maybe 1/4 of a cup of the meat and bean mixture in each one? Just eyeball it. I was going for about the size of a fat cigar but this recipe is flexible. After you've rolled the meat and bean mixture in a flour tortilla and placed them seam side down, spray each rolled tortilla with cooking spray. Since I was only making a couple for Skywalker and I, I also sprayed the open space then slide one roll over, sprayed, slide, spray slide. Basically I wanted to get some cooking spray on the bottom of each roll. Why yes, I did forget to spray the bottom of the pan before putting the rolls in! Good guess.


Once they're all ready to go, bake them for 5 to 6 minutes, flip and bake for another 5 to 6 minutes and they're DONE!


Skywalker really enjoyed these and so did I. I'm making them again this weekend (except with homemade tortillas) along with another version with shredded chicken, black bean and cheese. To accompany this weekend's flautas, I'm making salsa and white cheese dip to dip them in. You know that white cheese dip you can order at Mexican restaurants?? I *hopefully* found a recipe to recreate it at home. *fingers crossed*

This technique is so versatile and easy enough to execute that experimentation is encouraged. Make them bigger, make them smaller, use whatever leftover meat, beans, cheese, veggies or anything you think will taste good for the filling. This is a super simple meal that can be fitted to any one's tastes. Give it a try! (I admit, I totally started chowing down on one before I realized I hadn't taken a final picture)

Ingredients:

1 can of Pinto Beans, drained and rinsed
1/2 tsp cumin
flour tortillas

Directions:

  1. Preheat oven to 425F.
  2. Add pork roast, cumin and beans to a pot.
  3. Cook over medium heat until the pork is heated through.
  4. Shred meat, reduce temperature to medium low and let simmer for 5 to 10 minutes.
  5. Add about 1/4 of a cup of meat and bean mixture just off center of a flour tortilla and roll up.
  6. Place seam side down on a baking pan that's already been sprayed with cooking spray.
  7. Continue until desired number of flautas are created.
  8. Bake for 5 to 6 minutes, then flip tortilla rolls over and bake for another 5 to 6 minutes.
  9. Serve immediately and enjoy!

Friday, November 12, 2010

Pernil (Pork Roast)


Pernil, which is a pork roast, is a classic Puerto Rican dish. The smell of one reminds me of Christmas. We do the traditional turkey for Thanksgiving but Christmas Eve dinner usually consists of Pernil and Arroz con Gandules, along with a millon other things. We like to eat in our family! Let me warn you that this is not my mom's recipe. She has yet to provide that to me although I'm certain she's willing. I came across this Puerto Rican Pork Roast recipe on Allrecipes a few years back and have used it a couple of different times with only slight changes. When I pulled up the recipe again, I read my review and saw that I used minced garlic at the time... JARRED minced garlic. Yeah, I don't do that anymore. It's TOTALLY worth that tiny extra bit of effort to use fresh garlic. Fair warning, this recipe has a lot of steps mainly because I like to reduce the fat count as much as possible and a pork roast is VERY fatty. That being said, you will completely melt into a puddle of happy after your first bite of this roast.

First I preheated the oven to 350 degrees F and started gathering all of the ingredients. I pulled out all the garlic cloves I could find along with Adobo, pepper, oregano, white vinegar, the pork roast and olive oil.


First thing I wanted to do was get the seasoning mix ready to go. I bashed the garlic to easily remove the skin. Take a look at that fresh garlic! *double entendre alert* You see what I saw?? Put some pants on garlic clove!!! I'm sorry... I couldn't help it. I promise to keep my dirty mind in check for the remainder of this post.


As I gazed longingly at my pilon and wondered where the masher part was, I knew I wanted to mash the garlic as best as I could. I finely diced it and then went all MacGuyver. A bit of parchment paper and a mallet worked like a charm. By the way, want to feel real old? Ask a kid if they know who MacGuyver is.


After I mashed up my garlic, I started throwing together the rest of the ingredients and realized I was COMPLETELY out of black pepper in that little canister. Here's the problem. If you've read this blog you might have noticed several references to "freshly ground pepper". I use my pepper grinder ALL.THE.TIME. So I just had no idea I was out of the pre-ground stuff. Can I just say that having to hand grind 3 tablespoons of pepper takes a good minute?? Yeah totally sucked. I can't even pretend that was fun.


Once that task was done, I combined all of the remaining ingredients: 3 tbsp FRESHLY ground black pepper, 1 tsp of oregano, 3 tbsps of Adobo, just under 1 tbsp of white vinegar, 2 tbsp of olive oil and the minced garlic.


Next I removed the pork roast from the wrapping and trimmed some of the fat. Just a bit of the fat off the skin side and all of the fattiness on the side with no skin. I left the skin intact for the most part because I was going to use a different cooking technique that would create a crispy skin. A lot of people LOVE the crispy skin off of a pernil but I just wanted to see if I could do it more than anything. After trimming the roast, I stabbed it a bunch of times. I think women will really enjoy this, ESPECIALLY during the holiday season. Releasing a bit of pent up anger can't be a bad thing right?? What you want to do is create a bunch of incisions in the roast. These pockets (try to go about an inch or two deep) will hold the seasoning paste so you'll want to space them out all over the roast. I only did the sides that didn't have skin. The skin was so thick it was hard to cut through and I knew if I tried too hard, I'd probably end up accidentally slicing my hand. You'll want to do twice as many inciscions as what's shown below.


With the remaining bit of paste or really even with just what's on your hands and already on the roast, you'll want to rub the paste all over the outside of the roast. I HIGHLY recommend using plastic gloves. Although I used a small spoon to put the paste into the inciscions, I still use my fingers to help it along. The smell of the paste is strong and stays on your hands for hours even after a couple of good scrubs with soapy, hot water. I'm sure someone out there has some miracle smell remover (lemon juice??) but just to give everyone fair warning.

I don't have a roasting pan yet. I know! Terrible. So I shoved that roast into my cast iron pot. It wasn't easy cause of that dang bone but I got that roast as snug as a bug in a rug. I roasted it skin side down for 2 hours COVERED.


After two hours (of sleeping in since I put that sucker in at 6am), I flipped the roast to cook for 2 more hours. Pre-flip you can see how the skin has already shrunken back quite a bit to expose the bone.


For the last two hours of roasting, I kept it uncovered to produce that crispy skin I mentioned earlier.


Look at how crispy the skin is!! Can you even tell in pictures? It was super crispy. I tasted a tiny bit and it was nummy.


At this point, after the roast had cooled and while it was still in the pot, I set it in the refrigerator and went off for a couple of hours. The advantage to having to shove that roast into the pot was that it was a bit suspended over the bottom so it hovered over the fat for the most part. When I returned home, I got to work on breaking the roast down.


By breaking it into chunks I was able to remove most of the fat, gristle, bones and pretty much anything that wasn't meat. As I broke it down, I added it back to the pot which had the juices from the roast sans the congealed fat I'd already skimmed off.


As I was cutting the roast up, while already DELICIOUS, I felt it needed to cook a bit more. Plus I had time since I still had to start the rice and let the beans finish cooking. I set it to medium low, added about a cup of water and simmered for about 20 minutes. I added the extra water because I knew the additional cook time would concentrate the juices more. Without that extra water, the flavor of the roast juices would have been too strong. After everything was ready, I turned the heat off and waited 20 minutes to eat. That way we could enjoy dinner without singeing our mouths. :)


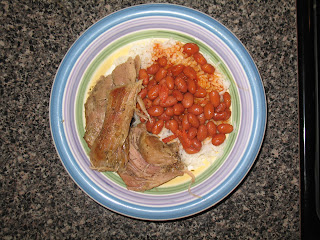
This dinner totally hit the spot. The meat was super tender (I cut into bite-sized pieces using a spoon!) and of course with the rice and beans, a little went a long way. I'm totally having leftovers for lunch... and a repeat for dinner. AND leftover meat can be used for carnitas or pork tacos or toasted sandwiches. Oh how I love a tasty roast. Yes this took time but again, it was totally worth it!

Ingredients:
(Adapted from Puerto Rican Pork Roast)

8 lb pork picnic roast
6 garlic cloves
3 tbsp Adobo
3 tbsp black pepper
2 tbsp olive oil
1 tbsp white vinegar
1 tsp of dried oregano

Directions:
  1. Preheat the oven to 350 degrees.
  2. Mash the garlic cloves or add to a food processor.
  3. Add to the mashed garlic Adobo, pepper, oregano, olive oil and the white vinegar. Thoroughly mix until a smooth paste.
  4. Using a knife, make numerous incisions all over the roast. With a small spoon, insert the paste into each incision.
  5. Place the roast skin side down and covered in the oven for 2 hours.
  6. After 2 hours, flip the roast and leave it uncovered. Cook for an additional 2 hours.
  7. Let roast cool. Skim fat off juices and cut roast into chunks, removing excess fat from the meat.
  8. Place the roast chunks back into the pot with the roast juices.
  9. Add one cup of water and simmer on medium low for 20 more minutes or until tender.

PS

My four-legged canine babies TOTALLY got in on the action. Both got to enjoy a hefty pork bone AND a chunk of crispy pork skin. Remember kids, NO CHICKEN BONES, but pork bones are safe.

Wednesday, November 10, 2010

Veggie Meatball Soup


I have a confession. I have never made meatballs before. I always feared a bland meatball or a dry meatball and well, let's be honest here... most meatballs require quite a bit of work. The art of laziness is a fine art that requires constant practice and attention. Meatballs are counterproductive to the refinement of my laziness skills. Still, I had some ground beef I wanted to use and I wanted to try something new. I'd eyeballed a few versions of Italian Wedding Soup but I wanted something with a bit more substance. I came across this Hearty Meatball Soup and decided I would use this recipe with a few changes. Here's what I gathered to start the soup: chicken broth, dry onion soup mix, diced tomatoes, Parmesan cheese, ground beef, orzo pasta, Italian bread crumbs, frozen mixed vegetables and black pepper.I also used water, a small can of tomato sauce, salt and adobo (you can use Lawry's or poultry seasoning).


The first thing I decided to do was put the meatball mixture together. I realized at this point that I had 2.25 pounds of ground beef but the recipe only called for 1 pound. I decided I'd make all of the meatballs and just freeze the extra for another day. To the ground beef I added the freshly grated Parmesan cheese, used 3 eggs total, 2 cups of bread crumbs, 2 teaspoons of adobo, 1 teaspoons of salt and 2 teaspoons of pepper. I used my Kitchenaid mixer with the paddle attachment to mix this up.


I set aside the meatball mixture to move on to the next step. I added the chicken broth and 4 cups of water to a pot. I used a box and a can of chicken broth so it equaled about 46 ounces total. To the liquid I added a 14.5 ounce can of diced tomatoes and a packet of dry onion soup mix.


The broth veggie mix needed to simmer for 15 minutes so while that was doing it's thing, I began rolling out some meatballs. Skywalker was going to help me but I have a sneaking suspicion that the bulk of meat to roll into mini balls seemed rather daunting to her because all of a sudden she had homework to do. What can I do? Encourage my daughter to set aside homework for my own selfish needs?? Of course not.. though let me tell ya, I was tempted! So off I went, all on my own, and rolled out oh, about 150 or so baby meatballs. Before I got too many meatballs made, I realized I wanted the meat mixture to be better combined so I got in there with my hands and kneaded the meat mixture until I felt it was well mixed. I figured squishing it through my hands, besides making me feel like a kid at play, would also help to distribute the flavor throughout. This is how I'll probably always make meatballs from now on. I feel like if I used my hands to mix the meatball mixture from start to finish, a lot of the fattiness from the ground beef would stick to my hands and potentially lead to dry meatballs. Fact? Fable? No idea, but this is what is logical in my mind. 


That's a lot of meatballs!! 


I added about 54 meatballs into the soup. Did I purposely line up all the meatballs and then count them all in order to do the math to determine approxiamtely a pound of meatballs to add to the soup? No! Cause that would be weird and neurotic. Anyone who knows me knows I'm not weird and neurotic... okay so at the very least they know I'm not neurotic... becuase at least THAT I do a better job at hiding. One by one I plopped in the totally random number of 54 meatballs into the soup, trying to evenly distribute them around the pot. Once they were in, I simmered for about 20 minutes. 


After 20 minutes had passed, I added a cup of orzo pasta. I love orzo pasta. I'm not really sure why. Maybe because it's a rice-look-alike and as a kid I used to sit around and eat my mom's white rice like it was the bestest meal ever? No idea. Now the original recipe called for a cup of alphabet pasta which I'm sure would be totally cute. One of the pictures uploaded showed the mini-shells which I'm sure is another good option, but I had orzo in the house and I wanted to use orzo. I debated on adding more than a cup but I'm glad I didn't because it really turned out to be the perfect amount. 


This soup was so delicious!! Keep in mind that the meatballs release a LOT of grease while cooking so you definitely want to skim the top of the soup before it is time to serve. 


All in all, I was super happy with this recipe. I froze part of it into two separate containers for future meals, left one container in the fridge for leftovers and both Skywalker and I really enjoyed this soup for dinner. The broth was flavorful, the meatballs were tender and tasty and every spoonful included veggies and pasta. Yum! I have to wonder if orzo isn't the best option because a bigger pasta would have taken up too much room. I prefer to have a bit of everything in every bite and that's how this soup turned out. 


Ingredients:

1 (1 ounce) envelope dry onion soup mix
4 cups water
1 (14.5 ounce) can stewed tomatoes, with juice
3 (14.5 ounce) cans chicken broth
1 (16 ounce) package frozen mixed vegetables
2.25 pounds ground beef
3 egg
2 cup dry bread crumbs
2 cup grated Parmesan cheese
2 tsp ground black pepper
1 tsp salt
2 tsp adobo (can substitute poultry seasoning or Lawry's)
1 cup uncooked orzo pasta
8 oz can tomato sauce

Directions:

  1. Combine the ground beef, eggs, bread crumbs, salt, Adobo, black pepper and Parmesan cheese. Set aside.
  2. In a large pot over medium high heat, combine the onion soup mix, frozen mixed vegetables, chicken broth, diced tomatoes and water. Bring to a boil, reduce heat and simmer for 15 minutes.
  3. Meanwhile, roll the meat mixture into tiny, bite-sized meatballs.
  4. Add the meatballs and a small can of tomato sauce to the soup.
  5. Simmer for another 20 minutes, then add the orzo pasta. Simmer for another 15 minutes or until the meatballs and pasta are fully cooked.

Saturday, November 6, 2010

Green Tomatoes Parmesan

I'm new to the world of fried green tomatoes. The idea just didn't appeal to me so I didn't avoid them per se, but I never initiated a taste either. I can't remember where I first tried fried green tomatoes but I'm pretty sure my sister-in-law, Mrs. FancyPants, had ordered some and I decided to give it a taste. It was good! How could I doubt though?? It's fried! I've since eaten fried green tomatoes from a couple of different places and I feel like the tomato itself is mild in flavor. The key is to make sure the batter is tasty so the end result is scrumptious. I would also suggest that even if you don't like tomatoes, try a fried green tomato next chance you get. You may be surprised!
I came across this recipe in my good friend T-Rae's Taste of Home magazine. It was full of prize winning recipes so I figured a fried green tomato recipe out of this magazine should be good. The original recipe called for 3 tomatoes but I had a four pack so I decided to just keep it simple and double the batter portion of the recipe. Also, I didn't have any garlic salt so I used garlic powder and salt instead. Same difference right! Also with the garlic, salt and green tomatoes, I also used cornmeal, freshly grated Parmesan, 2 eggs, canola oil, pepper and flour.
The first thing you want to do is slice the tomatoes into 1/4 inch slices. Lay them all out on paper towels and liberally sprinkle with salt. The recipe calls for letting the tomatoes sit for 30 to 60 minutes. I decided to let them sit for 60 minutes total because a few of my tomatoes were reddish on the inside which I figured would mean they would benefit from the extra time. The salt draws moisture out of the tomatoes. This technique is called "sweating" and is a common technique used on eggplants when making eggplant parm. 

 
While the green tomatoes were doing their thing, I put the dry batter together. Put all the dry ingredients in a shallow bowl.


Mix the ingredients together. You'll have one bowl of the beaten eggs and one bowl of the batter.


Once the green tomatoes are ready, dip each slice into the beaten eggs, then into the cornmeal batter. I made sure each slice was thoroughly coated and then layed them on a piece of aluminum foil. I would have used wax paper but my mom didn't have any.


I don't fry often so I purposely made this at my mom's house so she could fry these up for me. Plus I knew Skywalker wouldn't be eating them and if we did this during Sunday dinner, there would be plenty of adults and a few adventurous kids willing to scarf them down. So my mom heated the oil to the proper temperature and fried these puppies up.


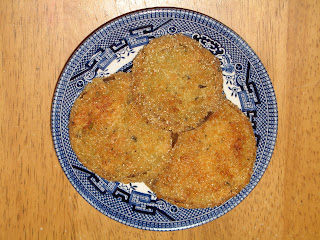
She fried them until they were perfectly golden brown. One day I'll be as good as my momma!


I realized I didn't create a dipping sauce which is how I've tried them in the past, but these were seasoned just right so no sauce was needed. Everyone seemed to enjoy them and they were gone in no time. Yum!!


Ingredients:
(slightly adapted from Taste of Home's Prize Winning Recipes Green Tomatoes Parmesan)

 
4 green tomatoes, sliced 1/4 inch thick
salt for sweating
1/2 cup of cornmeal
1/2 cup of Parmesan cheese
4 tbsp of all-purpose flour
1 tsp garlic powder
2 tsp salt
1/4 tsp pepper
2 eggs, beaten
1/2 cup vegetable oil

  
Directions:
  1.  Lightly sprinkle tomatoes with salt; drain on paper towels for 30-60 minutes.
  2. Meanwhile combine cornmeal, Parmesan, flour, garlic powder, salt, oregano & pepper in shallow plate.
  3. Dip each tomato slice into the beaten egg mix, then into the cornmeal mixture. 
  4. In a medium skillet, heat oil over medium-high. Fry tomatoes, a few at a time, for 2 minutes per side or until golden brown. Drain on paper towel-lined wire rack.

Tuesday, November 2, 2010

Pumpkin Cheesecake Layered Pie


Tis the season... when we start seeing pumpkins and sweet potato dishes. I had a block of cream cheese I wanted to use so I started searching for a recipe to try out. I came across this Pumpkin Cheesecake recipe because not only did it have rave reviews, I had everything I needed except for some pumpkin pie spice.

Here's what I needed to make this recipe: Whipped topping, Pumpkin Pie spice, flour, cream cheese, canned pumpkin, Jell-O Instant Vanilla pudding mix, milk, vanilla extract, chopped pecans, confectioner's sugar and a stick of butter. Typically I use unsalted butter when baking but all I had was salted so I went with it.


The first thing I needed to do was preheat the oven to 350 degrees F. The only thing that needs to bake is the crust so make sure you turn it off once the crust is done! I halved the recipe so instead of making a 9 x 13 pan I used my smallest rectangular pan which was 2.2 quart glass pan. For the crust I hand mixed the softened butter, finely chopped pecans and flour. I'll be honest, when making this crust I was worried because I'm not a big fan of pecans and the crust had no sugar so I wasn't sure how it would fare but I decided to stick with it as closely as possible.


After mixing the crust ingredients together, I pressed them evenly into the bottom of the pan and baked it for 15 minutes.


While the crust was baking, I had plenty of time to put the rest of the layers together so although this recipe has several steps, it really doesn't take too long! The key is to make sure the cream cheese and butter are at room temperature and the whipped topping isn't frozen.

Ok so for the next step, I used my KitchenAid Mixer to combine the cream cheese, 1 cup of whipped topping, confectioner's sugar and the vanilla extract.


It is important for the cream cheese to be at room temperature so that when you get to this stage everything blends together smoothly.


I set the blended cream cheese mixture aside for a moment and started assembling the next layer. Into a bowl I added the canned pumpkin, instant vanilla pudding mix, 1 more cup of whipped topping, the milk and about 1 1/2 tsp of pumpkin pie spice. The recipe halved would call for 2 whole tsps of pumpkin pie spice but I recalled reading in a review that someone felt like it was too much. After combining all the ingredients I tasted the pumpkin pie mixture and it tasted fantastic so I left it at 1 1/2 teaspoons of pumpkin pie spice.


The crust was ready just as I was putting the pumpkin pie layer ingredients together so I removed it from the oven and set it aside to cool down. Upon seeing the complete crust I thought to myself "pecan sandies!". Can't really say if they tasted that way since I haven't had a pecan sandy in FOREVER but that's what it reminded me of.


After all the layers were ready for assembly and the crust was sufficiently cooled, I coated the crust with the cream cheese layer.


Next I dropped blobs of the pumpkin pie mixture on top. Pretty eh?? haha! Ok, so not very attractive at this point HOWEVER I did this so I could easily smooth the pumpkin pie mixture over the cream cheese mixture without the two getting combined together.


 Worked like a charm!


After the cream cheese and pumpkin pie layers were added, I topped it off with a final layer of whipped topping.


 The hardest step of all? Letting it chill for a minimum of two hours.

The parts I tried separately were so tasty that I actually cranked the refrigerator up but left it in there for an hour and twenty minutes. I wanted a solid hour but wanted to make sure it would chill properly. Knowing we'd probably be in and out the fridge, I figured the extra time and lowered temperature would help ensure it would be ready to dig into after an hour and twenty minutes.


There are numerous steps to this Pumpkin Cheesecake but it was TOTALLY worth it!!! OH MY GOODNESS!!! Dangerous. It's one of those recipes. It was like a slice of pumpkin pied topped with whipped topping nestled on top of a no-bake cheesecake with this lovely, crumbly, wonderful crust.

Listen, if you do nothing else... make this recipe. Make it this weekend. Make it today. And share! Because otherwise you will eat the entire thing yourself and then you'll be upset with yourself and I don't want to be the reason anyone feels any self-loathing. But trust me... make this recipe. You will not regret it.

Ingredients:
(Slightly Adapted from Pumpkin Cheesecake I)


1 cups all-purpose flour
1 stick of butter, softened
1/2 cup chopped pecans
1 (8 ounce) packages cream cheese, softened
20 ounces frozen whipped topping, thawed
1 cups confectioners' sugar
1 teaspoons vanilla extract
3.5 ounce package instant vanilla pudding mix
1/4 cup milk
1 1/2 cups pumpkin puree
1 1/2 teaspoons pumpkin pie spice

Directions:

  1. Preheat oven to 350 degrees F (175 degrees C).
  2. In a medium mixing bowl combine flour, butter or margarine, and 1/2 cup chopped pecans. Beat until thoroughly combined. Press mixture into a 2 quart glass baking dish.
  3. Bake in preheated oven for 15 minutes. Set aside to cool.
  4. In a medium mixing bowl combine cream cheese, 1 cup of the whipped topping, confectioners' sugar, and vanilla extract. Beat until smooth. Spread evenly over cooled crust.
  5. In a large mixing bowl combine pudding, milk, pumpkin puree, pumpkin pie spice, and 1 more cups of whipped topping. Stir until thoroughly combined. Spoon mixture over cream cheese layer. Top off with whipped topping as final layer.