Tuesday, December 14, 2010

Mashed Taters


I can't explain why, but every time I think about mashed potatoes, I always think in my head mashed taters. Rest assured when the phrase "mashed taters" runs through my head, there is a STRONG southern twang. I'm weird like that.

Tis the season to make absurd amounts of food to share with friends, family and co-workers! I've made a million different mashed potato recipes over the years but I think from this point forward, I will stick with this super simple and very tasty version. The thing that I like about these mashed potatoes is that they taste really great without gravy but on the other hand the flavor isn't too distinctive so gravy can definitely be a welcome addition.

I have made these twice and both times it was extremely well received. I made them as part of my contribution to the Thanksgiving dinner and again for a holiday potluck. The kids devoured them which is always a good sign. Then at the potluck, a co-worker said she was going back for mashed potatoes because she rarely enjoyed them. I loved hearing that. Well not the part about rarely enjoying them but you know what I mean.

I used Make-Ahead Potatoes from Allrecipes with a few changes. I used 5lbs of red potatoes, cream cheese, sour cream, 3 cloves of garlic, salt and butter.


After peeling and dicing the potatoes, I added them to a large pot along with the three garlic cloves. Make sure the garlic skin is removed but leave them whole.


Boil the potatoes and garlic cloves for about twenty minutes or until the potatoes are tender. I generously salt the water to boil the potatoes. I essentially treat them like pasta I guess. I once heard the only time you can truly season pasta is when you boil it. The water should be salty like the sea! Now while I know that flavor can DEFINITELY be added to potatoes after the fact, I like to begin the process of flavor as soon as possible. That's also why I added the cloves of garlic.


When draining the potatoes I reserve some of the water. I'll keep this handy to use to thin out the mashed potatoes if they're a thicker consistency than I prefer. I also removed the three garlic cloves and after mashing them into a paste, I added them to my KitchenAid bowl.

To the garlic paste, I added 8 ounces each of cream cheese and sour cream and 6 tablespoons of butter. Honestly next time I'll probably use only 4 tablespoons of butter. I doubt it would make them taste less tasty and I've saved a smidgen on calories.


I then added the potatoes and 1 tablespoon of Kosher salt. Now I know what you're thinking... but no, that's not a typo. I put 1 tablespoon of Kosher salt into these babies. Listen, I like salt and for me, potatoes have a way of needing salt. So I went bold and used a tablespoon. I'll tell ya what though, not a single person will think these potatoes are over-salted. Trust me.

I used my KitchenAid mixer with the flat beater and thoroughly combined the ingredients. I added about a half cup or so of the potato water to thin the potatoes to the consistency I liked. I also saved the rest of the water in case I need to use some for when I served the potatoes the next day.

Oh man, these potatoes are supposedly better the next day but nothing beats piping hot, freshly beat mashed potatoes. Don't get me wrong, these potatoes were fabulous the next day but right out of that Kitchenaid mixer bowl those potatoes were heaven.


Quick tip on how I served them at the potluck. I popped these potatoes out the morning of the potluck and set them to warm up using a double broiler of sorts. I just took the big pot I used to boil the potatoes, filled it about half way up with water then set the crock pot dish of potatoes on top. I set the stove top to about medium to get the water hot, but not high enough that I couldn't leave it unattended. I was able to go about my morning, getting ready and helping Skywalker out the door and in the meanwhile the potatoes were warming up nice and slow. When it was time to head into work, I simply set the crock pot to warm and didn't change the setting again.

One tip I read was to put a towel or something between the lid and the potatoes so the condensation doesn't water the potatoes down. I used paper towels at work and probably replaced the paper towel every hour until it was time for the potluck. Since this keeps the potatoes from getting soupy it is basically removing moisture from the crock pot so if the potatoes get too thick, use some of the saved potato water.

Ingredients:

5 lb bag of red potatoes
8 ounces cream cheese
8 ounces of sour cream
4-6 tbsp butter
3 garlic cloves
1 tbsp of salt

Directions:

  1. Bring a large pot of salted water to a boil. Drop in potatoes and garlic, and cook until tender but still firm, about 20 minutes.
  2. Remove garlic and mash into a paste.
  3. Transfer potatoes to a large bowl, and mix in the cream cheese, sour cream, garlic paste, salt and butter.
  4. Serve immediately or cover, and refrigerate 8 hours, or overnight.
  5. Reheat using double broiler.

Tuesday, December 7, 2010

Pecan Pie Bake-Off


I know it’s been too long since I added a new post. I really try to have at least one new post a week and here it’s been a few weeks with nothing! On top of that, my last post wasn’t even a true recipe. Though I will say I’ve made the heck out of some flautas these last few weeks but I digress.

To shake off the cobwebs, I’ve decided to share with you my experience with pecan pie. My mom is a huge pecan pie fan so I decided to make some for Thanksgiving. I knew I wanted to try Pioneer Woman’s version but then I came across this version from Simply Recipes. It was a bit different and had received RAVE reviews so then I decided “Heck, I’ll make ‘em both!”. This IS Thanksgiving after all. I decided to take pictures of them as I made them side by side and then ask my family which they preferred so what we’ve got here folks is a PECAN PIE BAKE-OFF!!!
I liked Pioneer Woman’s version because she coarsely chops all the pecans. In the past I’ve always used whole pecans in my pecan pie so while it is of course scrumptious, it is kind of tricky to slice. The Simply Recipes pecan pie used molasses and less sugar so for anyone who likes pecan pie okay enough but finds it a bit too sweet, this might be the way to go. I adjusted the baking times so they could bake together so the first thing you’ll want to do is preheat the oven to 375 degrees.
Quite side note about pecan pies. They are SUPER easy to make as far as putting them together but they are SUPER tricky to bake properly. You want them to have a little bit of jiggle but too much jiggle and the filling won’t properly set, not enough and you’ve over-baked it. I moved last November but in my old house I’d perfected the baking time for my pecan pies. Then I got a new oven and never could get it right again. This is the first time I’ve done pecan pie in probably three or more years. Tricky indeed!
Here’s what I used. On the left hand side are the ingredients needed for molasses pecan pie which include molasses, eggs, salt, flour, butter and pecans.  On the right are the ingredients for the classic pecan pie which include salt, eggs, butter but also brown and white sugar. Straight center I set the ingredients that both pies used which are corn syrup and vanilla extract.

Mix all the ingredients together except for the pecans. I’m not sure if you can tell from the pictures, but the molasses pecan pie has less liquid so I know it will make a thinner pecan pie. The batter was also a bit darker from that tablespoon of molasses.
  
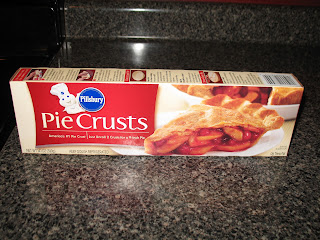
I considered making my own pie crust because really and truly, one day I would like to attempt and then master the art of making my own pie crust but I was also making a couple of other dishes to contribute to the turkey day feast so I opted to use these lovely little things. 


Hey, it’s one step above what I used to do which was buy the pie crust plates already set into the aluminum tins! The Pillsbury pie crust box recommended lightly flouring the pie plate and then setting the pie crust into it for pies with high sugar content. This will help prevent the crust from sticking to the pie plate. 

I set the pie crust into the pie plate and gently pressed the bottom down all the way across the bottom of the pie plate.


Then I pressed the dough up the sides of the pie plate.


I tucked the excess dough under (for the one plate that had excess dough) and pinched the edges to create a uniform pattern. Next time I will make the pattern a bit more dramatic because after baking, it wasn't nearly as noticeable.


I then added the chopped pecans to each pie plate.


And poured the respective pecan pie filling into each pie plate. To make it look all fancy for the holidays, I took four whole pecans, coated them in the leftover pecan pie filling and placed them on top in the center. Next time I'll add a few more to make it look more like a sunburst. Up the fancy factor on this easy pie! I baked the pies uncovered for about 20 minutes.


After 20 minutes had passed, I went ahead and tented them both with aluminum foil. What that means is you basically take a square of aluminum foil, fold it in half to create a tent, and set over the pie. This helps prevent the crust from getting overly brown. I used to wrap the crust in foil but this was SO much easier and just as effective. 

I baked them both for 20 minutes more minutes. After 40 minutes total I checked the jiggle factor on both. The molasses pie was perfect! I went ahead and pulled that one out of the oven and gave the classic pecan pie 10 more minutes. 


 After 10 minutes had passed, I checked on the remaining pecan pie and the jiggle factor was excellent so out it came. 


Mmmmm… pecan pie!


So after we had stuffed ourselves silly with turkey (BEST EVER MOM!!!!!!), stuffing, collards, mashed potatoes, etc., etc., I made sure to tell everyone who was having pecan pie to have a bit of both and tell me which one they preferred. Granted this was only a few people because the kids (who totally outnumbered the adults) were leery of the pecan pies. The general consensus was that the classic pecan pie was the preferred pie. 

Here’s the kicker… when I went to my mom’s the next day, the molasses pecan pie was GONE! They’d gobbled it up, assuming they were eating the classic pecan pie!


So obviously neither pie is bad at all. Nobody is going to eat a slice of the molasses pecan pie and think it’s not tasty.

Ingredients:


2 9-inch pie crusts, prepped per directions
flour for sprinkling into bottom of pie plate

Molasses Pecan Pie -

1 1/4 cups chopped pecans
2 eggs, beaten
1 cup light corn syrup
1/4 cup brown sugar
1 Tbsp molasses
2 Tbsp melted butter
2 Tbsp flour
1/4 teaspoon salt
1 teaspoon vanilla

Classic Pecan Pie -

1 cup White Sugar
3 Tablespoons Brown Sugar
½ teaspoons Salt
1 cup Corn Syrup
¾ teaspoons Vanilla
⅓ cups Melted Butter
3 whole eggs Beaten
1 1/4 cups Chopped Pecans

 Directions:

  1. Preheat oven to 375 degrees.
  2. Mix together all of the ingredients for each pie except for the pecans. Set aside.
  3. Place each pie crust into floured pie plate.
  4. Add proper amount of pecans into each pie plate.
  5. Pour pecan pie mixture over pecans.
  6. If desired, dip whole pecans into pecan pie mixture left in bowls. Place atop pies as decorative touches.
  7. Bake 20 minutes uncovered.
  8. Tent with foil and bake 20 minutes more or until set.
  9. If pie too jiggly, bake for an additional 5-10 minutes at a time until pecan pie jiggles only a bit.